
Unlock the Secrets of Precise Polar Alignment and Unleash the Power of Your Equatorial Mount for Stunning Astrophotography.
Astrophotography is a breathtaking and rewarding pursuit that allows us to capture the beauty of the cosmos. To achieve those stunning, sharp images of distant galaxies, nebulae, and star clusters, precise polar alignment of your equatorial mount is crucial. Polar alignment ensures that your telescope tracks the apparent motion of the stars accurately, minimizing star trails and ensuring your celestial targets stay in your frame for extended periods. In this comprehensive guide, we’ll walk you through the steps to accurately polar align your equatorial mount for astrophotography, unlocking the full potential of your equipment.
The Importance of Accurate Polar Alignment
Before we dive into the step-by-step process of polar alignment, it’s essential to understand why this meticulous procedure is so vital for astrophotography. An equatorial mount is designed to mimic the rotation of the Earth, allowing your camera or telescope to follow the stars as they appear to move across the night sky. Here’s why precise polar alignment is a game-changer:
1. Eliminating Star Trails
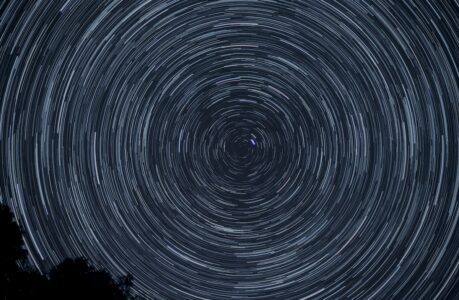
Accurate polar alignment ensures that your mount’s tracking matches the Earth’s rotation, preventing star trails from appearing in your long-exposure images. Star trails can be aesthetically pleasing in certain situations, but for most astrophotography purposes, sharp and pinpoint stars are the goal.
2. Extended Exposure Times
With proper polar alignment, you can achieve longer exposure times, capturing more details of faint celestial objects. Longer exposures reveal intricate structures within galaxies, colorful nebulae, and subtle features on the moon and planets.
3. Improved Guiding Accuracy
Precise alignment reduces the workload on your autoguiding system, which is responsible for making micro-adjustments to keep your telescope on target. This means less correction is required, resulting in better image quality.
4. Better Image Stacking
When capturing multiple images for stacking and post-processing, accurate alignment ensures that each frame aligns seamlessly with the others. This leads to cleaner and more detailed final images.
Now that you understand the significance of polar alignment, let’s dive into the step-by-step process to achieve it.
Step 1: Find Your Celestial Pole
The first step in polar alignment is locating the celestial pole. The celestial pole is the point in the sky around which all the stars appear to rotate. There are two celestial poles: the North Celestial Pole (NCP) in the Northern Hemisphere and the South Celestial Pole (SCP) in the Southern Hemisphere.
- Northern Hemisphere: To find the NCP, locate the North Star, also known as Polaris. Polaris is not the brightest star in the sky, but it’s reasonably bright and easy to spot. It is located approximately in line with the two outer stars of the Big Dipper’s bowl.
- Southern Hemisphere: Finding the SCP is a bit trickier because there is no bright star near it like Polaris. Instead, you’ll need to use the Southern Cross (Crux) constellation. Draw an imaginary line from the top star to the bottom star of the Southern Cross, and extend it about four and a half times the distance between those two stars. This will get you close to the SCP.
Step 2: Set Up Your Mount
Once you’ve identified the celestial pole, it’s time to set up your equatorial mount. Follow these steps:
- Place your mount on a level surface. Use a bubble level to ensure it’s perfectly horizontal.
- Orient the mount so that it’s facing north (in the Northern Hemisphere) or south (in the Southern Hemisphere). You can use a compass to get a rough idea of the direction.
- Make sure the mount’s polar axis is parallel to the Earth’s axis. This means that in the Northern Hemisphere, the polar axis should point toward the NCP, while in the Southern Hemisphere, it should point toward the SCP.
Step 3: Balance Your Mount
Balancing your equatorial mount is crucial for smooth tracking and accurate polar alignment. Follow these steps to achieve balance:
- Attach your telescope or camera to the mount, making sure it’s securely fastened.
- Adjust the declination axis (the one that tilts the telescope up and down) so that your equipment remains level.
- Balance the right ascension axis (the one that rotates the telescope) by moving the counterweights. The goal is to have the telescope stay in any position without swinging when you let go.
Step 4: Rough Polar Alignment
Before diving into precise alignment, it’s helpful to perform a rough polar alignment. Here’s how:
- Use the altitude and azimuth adjustments on your mount to point your telescope toward the celestial pole as closely as possible.
- If you’re in the Northern Hemisphere, Polaris should now be in your telescope’s field of view. In the Southern Hemisphere, the SCP will not be visible through the telescope, so you’ll need to use other alignment methods.
Step 5: Use a Polar Alignment Scope
A polar alignment scope is a valuable tool that simplifies the alignment process. It contains a reticle with markings to help you align with the celestial pole accurately. Follow these steps when using a polar alignment scope:
- Look through the polar alignment scope and adjust your mount’s altitude and azimuth until Polaris (in the Northern Hemisphere) or the SCP (in the Southern Hemisphere) aligns with the reticle’s markings.
- This step fine-tunes your rough alignment, bringing you closer to accurate polar alignment.
Step 6: Align with a Smartphone App
If you don’t have a polar alignment scope, you can use smartphone apps to assist in the alignment process. Many apps are available for both Android and iOS devices. Here’s how to use them:
- Open a polar alignment app and enter your location.
- Follow the on-screen instructions to align your mount with the celestial pole using the app’s guidance.
- This method can be highly accurate when done correctly.
Step 7: Guided Star Alignment
Another approach to precise polar alignment involves capturing images of stars and using software to guide your adjustments. Here’s how it works:
- Set your camera to a high ISO setting and take a long-exposure image of the night sky.
- Analyze the star trails in the image to determine how far off your polar alignment is.
- Make incremental adjustments to your mount’s altitude and azimuth and continue taking test images until the star trails are minimized.
Step 8: Drift Alignment
Drift alignment is a more advanced technique that requires patience and practice but can result in extremely accurate polar alignment. Here’s the process:
- Choose a star near the celestial equator and center it in your telescope’s field of view.
- Watch the star for a few minutes, paying attention to its movement.
- If the star drifts north or south, adjust your mount’s altitude accordingly.
- If the star drifts east or west, adjust your mount’s azimuth.
- Continue this process until the star remains stationary in your field of view for an extended period.
Step 9: Fine-Tune with Autoguiding
If you have an autoguiding system, it can further enhance your polar alignment. Autoguiding involves using a separate camera and software to make real-time adjustments to your mount’s tracking. Here’s how to fine-tune with autoguiding:
- Set up your autoguiding system and select a guide star.
- Let the autoguiding system make small corrections to your mount’s tracking.
- As it guides, your mount will gradually become more accurately aligned with the celestial pole.
Step 10: Recheck and Refine
Achieving precise polar alignment is an iterative process. After following the above steps, it’s essential to recheck your alignment periodically and make any necessary refinements. Atmospheric conditions and equipment setup can affect alignment over time.
Conclusion
Accurate polar alignment is the foundation of successful astrophotography. By following these ten steps and using the available tools and techniques, you can ensure that your equatorial mount tracks the stars with precision. This, in turn, will lead to stunning images of the night sky, revealing the wonders of the cosmos in all their glory. Remember that practice makes perfect, and as you gain experience, your ability to achieve precise polar alignment will improve, allowing you to capture ever more captivating celestial photographs. Happy stargazing!