Astrophotography is a complex and challenging discipline that requires a keen eye, technical know-how, and plenty of patience. One of the biggest challenges faced by astrophotographers is capturing long-exposure images of the night sky without introducing any star trailing or other unwanted artifacts. Fortunately, there is a powerful tool that can help you achieve perfect results: autoguiding.
Autoguiding is a technique that uses a dedicated camera or sensor to track the movement of stars in the sky and make precise corrections to your telescope’s pointing. With autoguiding, you can take long-exposure images of the night sky without worrying about the Earth’s rotation causing the stars to blur or drift off-center. In this chapter, we’ll explore the key components and techniques you need to master the art of autoguiding.
The Key Components of Autoguiding
Autoguiding requires a few essential components to work effectively. These include:
- Autoguider Camera or Sensor: The autoguider camera or sensor is the heart of your autoguiding setup. It is responsible for tracking the stars and making corrections to your telescope’s pointing. There are two main types of autoguiders: stand-alone autoguider cameras and guide sensors built into larger cameras.
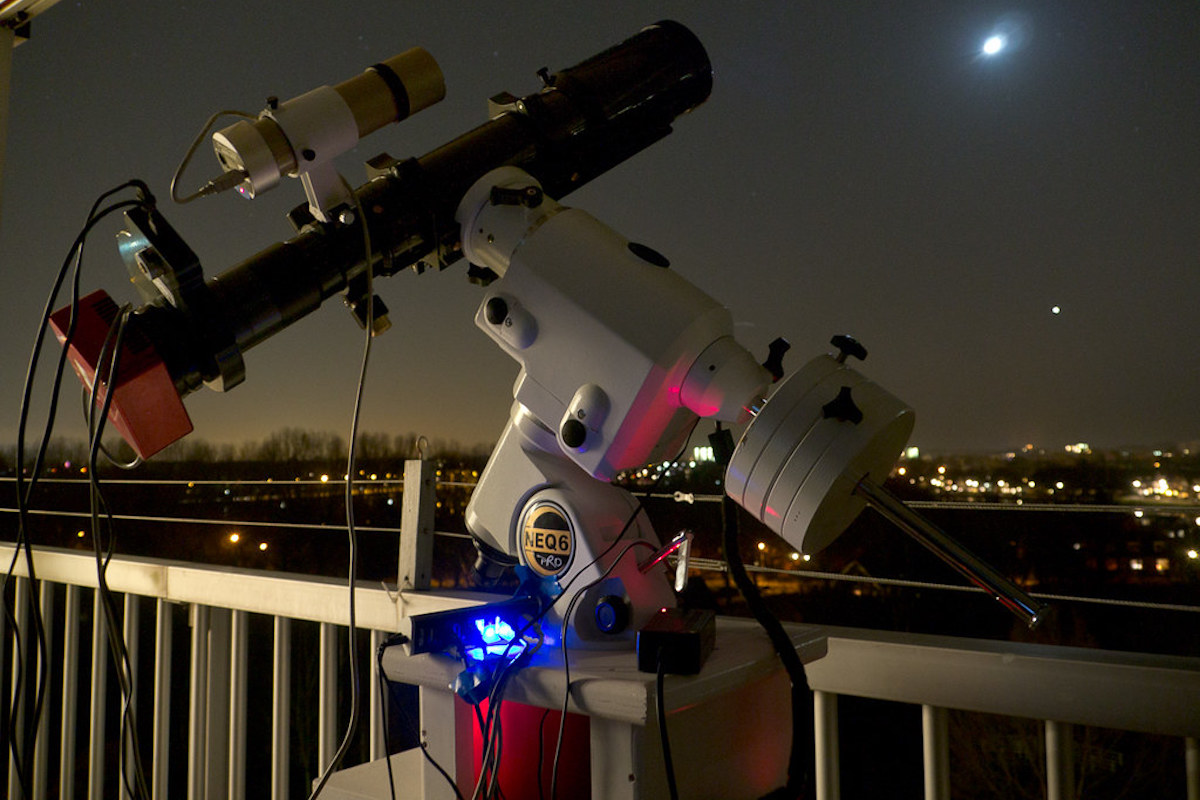
- Guide Scope: The guide scope is a small telescope that is used to capture images of stars for the autoguider camera or sensor to track. It is typically mounted alongside your main imaging telescope.
- Mount: Your mount is responsible for keeping your telescope pointed accurately at the stars. It needs to be sturdy and stable, with accurate tracking capabilities.
- Autoguiding Software: Autoguiding software is used to analyze the images captured by the autoguider camera or sensor and send corrections to your mount. There are many different autoguiding software options available, including PHD2, MetaGuide, and AstroArt.
Techniques for Successful Autoguiding
Once you have your autoguiding setup in place, there are a few techniques you can use to ensure success. These include:
- Calibration: Before you start autoguiding, you need to calibrate your autoguider camera or sensor. This involves taking a series of images of a guide star and using them to calculate how much your mount needs to be adjusted to keep the star centered.
- Guide Star Selection: The guide star is the star that your autoguider camera or sensor will track. It needs to be bright enough to be easily detected but not so bright that it saturates the camera’s sensor. Look for a guide star that is close to your target object and has a stable position in the sky.
- Exposure Time and Gain: The exposure time and gain settings on your autoguider camera or sensor will affect its ability to track the stars. Longer exposure times will give you more accurate tracking but may introduce noise into your images. Higher gain settings will make it easier to detect faint stars but may also increase noise.
- Guiding Rates: The guiding rates you use will depend on your mount and the focal length of your guide scope. Generally, you want to use slower guiding rates for longer focal lengths and faster rates for shorter focal lengths.
- Dithering: Dithering is a technique that involves making small, random adjustments to your mount’s pointing between exposures. This can help to reduce noise in your final image by spreading it out over multiple frames.
What is a guidestar?
A guide star is a bright star that is used as a reference point for autoguiding in astrophotography. The autoguiding system uses the guide star to track its movement and make corrections to the pointing of the telescope to keep it centered on the target object. The guide star should be bright enough to be easily detected by the autoguider camera or sensor, but not so bright that it saturates the sensor or causes blooming. It should also be close enough to the target object to ensure accurate tracking. A guide star can be selected using a variety of methods, such as manual selection, automatic selection by autoguiding software, or by using a star catalog. The selection of a suitable guide star is an important step in the autoguiding process and can have a significant impact on the quality of the final astrophotography image.
Autoguider sensors
There are several autoguider sensors available in the market that can be used for astrophotography. Here are some examples:
- ZWO ASI120MM Mini: This is a popular and affordable monochrome autoguider camera that can capture high-quality images of guide stars. It has a 1.2-megapixel sensor with high sensitivity and low noise, making it ideal for autoguiding.
- QHY5L-II: This is another popular monochrome autoguider camera that is known for its high sensitivity and low noise. It has a 1.2-megapixel sensor and can capture images at high frame rates.
- Starlight Xpress Lodestar X2: This autoguider camera has a high sensitivity, high-resolution sensor that can capture clear and accurate images of guide stars. It also has a built-in USB hub that allows you to connect other devices to your computer.
- SBIG ST-i: This is a versatile autoguider camera that can be used for both autoguiding and planetary imaging. It has a high-sensitivity sensor and can capture images at high frame rates.
- Orion StarShoot AutoGuider Pro & 60mm Guide Scope Package: This package includes a guide scope and autoguider camera that are designed to work together seamlessly. The autoguider camera has a sensitive sensor and can capture images at high frame rates, while the guide scope provides a wide field of view for finding guide stars.
Commonly used guidescopes
Guidescopes are an essential component of an autoguiding setup, used to capture images of guide stars for the autoguider camera or sensor to track. Here are some commonly used guidescopes:
- Orion Mini 50mm Guide Scope: This is a popular guiderscope that is compact and lightweight, making it easy to attach to your imaging telescope. It has a 50mm aperture and a focal length of 162mm, providing a wide field of view for finding guide stars.
- William Optics Zenithstar 61 Guide Scope: This is a high-end guiderscope that is designed for astrophotography. It has a 61mm aperture and a focal length of 360mm, providing a wide field of view for finding guide stars. It also has a built-in rotator that allows you to adjust the orientation of the guide scope without having to move your imaging telescope.
- Celestron 80mm Guidescope Package: This package includes an 80mm aperture guide scope and a finder scope for locating guide stars. The guide scope has a focal length of 400mm, providing a wide field of view. It also comes with a sturdy mounting bracket that attaches to most telescopes.
- Sky-Watcher Evoguide 50ED Guidescope: This is a high-quality guiderscope that is designed for astrophotography. It has a 50mm aperture and a focal length of 242mm, providing a wide field of view for finding guide stars. It also has a built-in rotator that allows you to adjust the orientation of the guide scope without having to move your imaging telescope.
- Meade Instruments 70mm Adventure Scope: This is a versatile guiderscope that can be used for both visual observing and astrophotography. It has a 70mm aperture and a focal length of 400mm, providing a wide field of view for finding guide stars. It also comes with a sturdy mounting bracket that attaches to most telescopes.
What sort of mount do you need to use
To use autoguiding for astrophotography, you need a sturdy and stable mount that is capable of accurate tracking. Here are some examples of mounts that are commonly used with autoguiding:
Sky-Watcher HEQ5 Pro SynScan
This is a popular mount among astrophotographers that provides a solid and stable platform for imaging. It has a payload capacity of 13.7 kg and precise tracking capabilities, making it ideal for long-exposure astrophotography. It also comes with a SynScan hand controller that allows you to easily control the mount and access a variety of features.
Celestron CGX-L Equatorial Mount
This is a heavy-duty mount that is designed for astrophotography. It has a payload capacity of 25 kg and can provide sub-arcsecond tracking accuracy. It also comes with a NexStar+ hand controller that allows you to easily control the mount and access a variety of features.
iOptron CEM60 Equatorial Mount
This is a compact and portable mount that is designed for astrophotography. It has a payload capacity of 27 kg and can provide sub-arcsecond tracking accuracy. It also has a built-in iPolar camera that allows you to easily polar align the mount.
Losmandy G11 Equatorial Mount
This is a heavy-duty mount that is designed for astrophotography. It has a payload capacity of 22.7 kg and can provide sub-arcsecond tracking accuracy. It also comes with a Gemini 2 computerized hand controller that allows you to easily control the mount and access a variety of features.
Orion Atlas Pro AZ/EQ-G Computerized GoTo Telescope Mount
This is a versatile mount that can be used for both visual observing and astrophotography. It has a payload capacity of 18.1 kg and can provide sub-arcsecond tracking accuracy. It also comes with a SynScan hand controller that allows you to easily control the mount and access a variety of features.