Discover the wonders of astrophotography by using your smartphone to capture stunning images through your telescope.
Are you a stargazing enthusiast? Do you find yourself gazing up at the night sky, mesmerized by the cosmic wonders that sparkle above? If so, you’ve likely considered taking your passion to the next level with astrophotography. In today’s digital age, it’s easier than ever to capture breathtaking images of celestial objects using equipment you might already have on hand – your smartphone and a telescope. In this article, we’ll delve into the exciting realm of smartphone astrophotography and explore the question: Can I use my smartphone to take pictures through a telescope? Get ready to uncover the possibilities that lie at the intersection of technology and the cosmos.
Unveiling the Potential
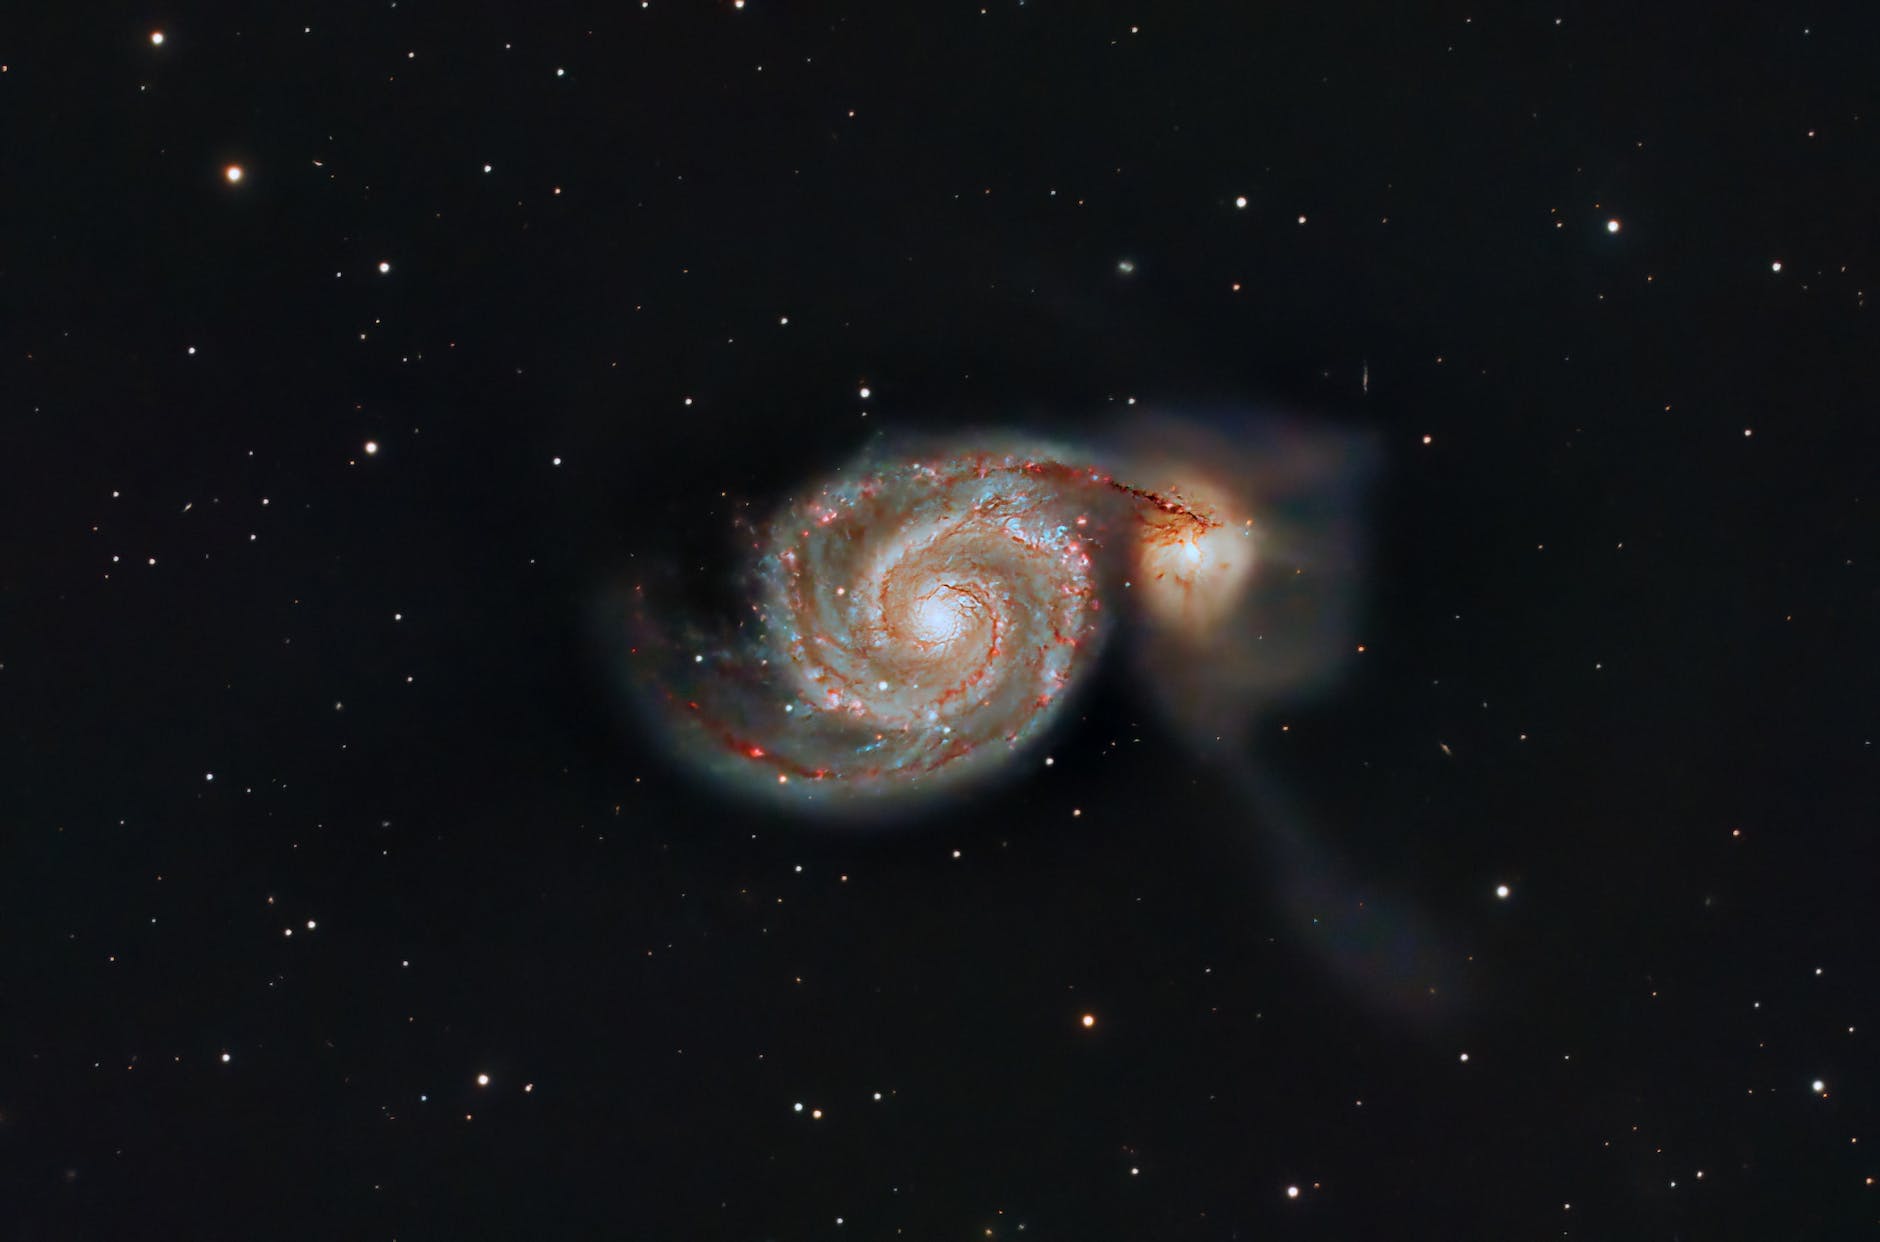
Imagine being able to capture the intricate details of the Moon’s craters, the majestic rings of Saturn, or the ethereal beauty of distant galaxies. Astrophotography offers a unique opportunity to share the universe’s splendor with others and preserve your own celestial experiences. While dedicated astrophotography equipment can be expensive and complex, the good news is that you can kickstart your journey using a tool that’s likely already in your pocket – your smartphone. Modern smartphones are equipped with advanced cameras that boast impressive capabilities, including high-resolution sensors, versatile manual controls, and noise reduction algorithms. This technological prowess opens the door to a world of astrophotography, allowing amateur astronomers and photography enthusiasts to capture stunning astronomical sights with relative ease.
The Telescope-Smartphone Synergy
As you stand beneath the vast expanse of the night sky, your smartphone and telescope have the potential to form a powerful partnership, enabling you to capture what your naked eye alone cannot perceive. The telescope serves as the eyes of your setup, gathering light and focusing it to reveal distant celestial objects in all their glory. On the other hand, your smartphone acts as the sensor, capturing the amplified light and translating it into digital images. When combined, these two tools complement each other seamlessly, resulting in images that are greater than the sum of their parts.
Selecting the Right Gear
Before embarking on your journey into smartphone astrophotography, it’s important to ensure that your equipment is up to the task. If you already own a telescope, you’re well on your way. Telescopes come in various types, including refractors, reflectors, and compound telescopes, each with its own strengths. For beginners, a refractor telescope might be an excellent choice due to its ease of use and minimal maintenance requirements. To connect your smartphone to the telescope, you’ll need an adapter specifically designed for your smartphone model. These adapters come in various designs, with some attaching directly to the eyepiece and others replacing it entirely. It’s crucial to select an adapter that ensures a secure fit and proper alignment, as this directly impacts the quality of your captured images.
Mastering the Technique
While the thought of capturing celestial objects through your smartphone may seem daunting, mastering the technique is within your reach. As with any form of photography, practice makes perfect. Begin by familiarizing yourself with your smartphone’s camera settings. Some smartphones offer manual controls that allow you to adjust parameters such as ISO, shutter speed, and focus. Experiment with these settings to find the optimal configuration for different objects, as the Moon’s bright surface requires different settings than the faint light of distant galaxies. Additionally, investing in a smartphone app designed for astrophotography can be incredibly helpful. These apps often provide star charts, object tracking, and exposure calculators to assist you in capturing the night sky’s wonders with precision.
Overcoming Challenges
While smartphone astrophotography offers a gateway to capturing cosmic beauty, it’s important to acknowledge the challenges you may encounter along the way. One of the primary hurdles is light pollution. Urban and suburban areas are often plagued by artificial light that obscures the night sky’s brilliance. To mitigate this issue, consider venturing to darker skies, such as rural areas or designated dark sky reserves. Additionally, be prepared to invest time in aligning your telescope and smartphone accurately. Even the slightest misalignment can result in blurry or distorted images. Patience and persistence are key virtues in the world of astrophotography.
Post-Processing Magic
Once you’ve successfully captured a series of images through your smartphone-telescope setup, the magic continues in the realm of post-processing. Just as professional photographers enhance their images using software, you can elevate your astrophotography to the next level. Numerous apps and software solutions are available for editing and enhancing your astronomical images. From adjusting contrast and color balance to reducing noise and sharpening details, these tools allow you to refine your images and bring out the hidden beauty of the cosmos.
Sharing the Cosmos
Astrophotography is not only a means of personal enjoyment but also a way to inspire and educate others about the magnificence of the universe. Once you’ve captured awe-inspiring images of celestial objects, don’t hesitate to share them with your friends, family, and the wider world. Social media platforms, online astronomy communities, and photography forums provide spaces to showcase your work, receive feedback, and engage in discussions with fellow enthusiasts. By sharing your images and experiences, you contribute to a collective celebration of the cosmos and encourage others to explore the wonders that lie above.
Infinite Possibilities
In conclusion, the answer to the question “Can I use my smartphone to take pictures through a telescope?” is a resounding yes. Through the marriage of technology and astronomy, smartphone astrophotography opens up a realm of infinite possibilities for capturing the beauty of the cosmos. Whether you’re a seasoned astronomer or a photography novice, this fusion of disciplines invites you to embark on a journey of discovery and creativity. So, next time you find yourself gazing up at the stars, remember that your smartphone holds the key to unveiling the universe’s most captivating secrets.
Embark on a journey of cosmic discovery with smartphone astrophotography. Unveil the universe’s splendor through your telescope and capture stunning images with your smartphone’s advanced camera capabilities. Join us as we delve into the exciting realm of astrophotography and explore the infinite possibilities that lie at the intersection of technology and the cosmos.
Exploring Equipment Essentials for Smartphone Astrophotography Through Telescopes
Unlock the celestial wonders above by assembling the right equipment for smartphone astrophotography through your telescope.
Embarking on a journey into the realm of smartphone astrophotography requires more than just a smartphone and a telescope. To capture the mesmerizing beauty of the night sky, you need a carefully curated selection of equipment that synergizes your smartphone’s imaging capabilities with the magnifying power of your telescope. In this guide, we will delve into the essential equipment you need to embark on this celestial adventure and capture stunning images of distant galaxies, planets, and more.
1. Telescope
At the heart of your astrophotography setup lies the telescope itself. The type of telescope you choose will influence the quality and versatility of your images. Telescopes come in various designs, including refractors, reflectors, and compound telescopes. For beginners, a refractor telescope can be a great choice due to its user-friendly design and low maintenance requirements. However, if you’re an experienced astronomer, you might opt for a more advanced reflector or compound telescope to capture fine details of celestial objects.
2. Smartphone Adapter
The smartphone adapter is the crucial link that connects your smartphone’s camera to the telescope’s eyepiece. These adapters are designed to securely hold your smartphone in place and align its camera with the telescope’s optics. When selecting an adapter, ensure it is compatible with your smartphone model and telescope type. Some adapters attach directly to the eyepiece, while others replace it entirely. A well-fitted adapter guarantees stable positioning, resulting in clear and sharp images.
3. Eyepiece
While not all smartphone astrophotography setups require an eyepiece, using one can enhance your experience. An eyepiece magnifies the image seen through the telescope and helps align your smartphone’s camera. If you’re using an eyepiece, ensure it’s of good quality and offers a comfortable viewing experience. Some smartphone adapters replace the eyepiece, while others can be attached to it. Experiment with different eyepieces to find the one that provides the best balance between magnification and image brightness.
4. Smartphone
Your smartphone’s camera is the heart of your astrophotography setup. Choose a smartphone with a high-quality camera that offers manual controls for settings like ISO, shutter speed, and focus. These manual controls allow you to fine-tune your settings to capture the best possible images of celestial objects. Additionally, a smartphone with advanced noise reduction algorithms will help reduce graininess in your low-light images.
5. Tripod or Mount
To prevent blurry images caused by vibrations, a stable platform is essential. While some smartphone adapters include a mount, others may require you to attach your smartphone to a tripod or telescope mount. A sturdy tripod or mount ensures that your setup remains steady during the exposure, resulting in clear and sharp images.
6. Remote Shutter Release
Even the slightest touch can cause vibrations that affect image quality during longer exposures. To avoid this issue, consider using a remote shutter release or a smartphone app that allows you to trigger the camera’s shutter without physically touching the phone. This remote control capability enables you to capture longer exposures without introducing unwanted vibrations.
7. Light Pollution Filter
Light pollution is a common challenge in astrophotography, particularly in urban or suburban areas. A light pollution filter can help mitigate the effects of artificial light, enhancing the contrast and visibility of celestial objects. These filters come in various types, each designed to target specific wavelengths of light pollution. Select a filter that suits your observing location and the type of objects you intend to photograph.
8. Smartphone Apps
There is a range of smartphone apps designed specifically for astrophotography that can greatly enhance your experience. These apps provide features such as star charts, object tracking, and exposure calculators. Apps like Star Walk, SkySafari, and NightCap Pro offer invaluable tools for planning and executing your astrophotography sessions.
9. Editing Software
After capturing your images, post-processing software allows you to refine and enhance them further. Apps like Adobe Lightroom Mobile or Snapseed provide tools for adjusting contrast, color balance, and sharpness. You can also use stacking software to combine multiple images and reduce noise, resulting in clearer and more detailed final images.
10. Patience and Passion
While not a physical piece of equipment, patience and passion are perhaps the most important components of your astrophotography journey. Astrophotography can be challenging, and the learning curve can be steep. However, with dedication and a passion for the cosmos, you’ll gradually refine your skills and capture breathtaking images that showcase the universe’s wonders.
As you gather these essential components, remember that each piece plays a vital role in creating a seamless synergy between your smartphone and telescope. By carefully selecting and assembling your equipment, you’re setting the stage for a journey of discovery through smartphone astrophotography. With the cosmos as your canvas and technology as your brush, you’re ready to capture images that bridge the gap between Earth and the stars above.
Unveiling the Mysteries: Mastering Astrophotography with Your Smartphone
Capture the celestial wonders of the night sky using your smartphone’s camera with these step-by-step guidelines for astrophotography.
The night sky, a canvas adorned with twinkling stars, distant galaxies, and the enigmatic Moon, has captivated humanity for millennia. In the age of advanced technology, the ability to capture these cosmic marvels is no longer confined to professional astronomers armed with complex equipment. With the powerful camera in your smartphone and a bit of know-how, you too can embark on a journey of astrophotography. In this guide, we’ll take you through the process of capturing stunning images of celestial objects with your smartphone, transforming you into a celestial artist.
1. Gear Preparation
Before venturing into the realm of astrophotography, ensure that you have the necessary equipment assembled and ready. You’ll need your smartphone with a high-quality camera, a telescope with a compatible smartphone adapter, a stable platform such as a tripod or mount, and a remote shutter release if available. Make sure your smartphone’s battery is fully charged and that you’re in an area with minimal light pollution for the best results.
2. Setup and Alignment
Position your telescope in a stable location with an unobstructed view of the night sky. Set up your tripod or mount, ensuring it’s level and secure. Attach the smartphone adapter to the telescope’s eyepiece according to the manufacturer’s instructions. Align your telescope to a bright and easily recognizable object like the Moon or a bright star. This alignment ensures that your smartphone’s camera is pointing in the right direction.
3. Manual Camera Settings
Unlock the full potential of your smartphone’s camera by switching to manual mode. Adjust your camera settings to control crucial aspects of your image. Start by setting the ISO to a low value (e.g., 100 or 200) to reduce noise in your images. Experiment with longer shutter speeds (15-30 seconds) to capture more light from distant objects. Adjust the focus to infinity or manually focus on a bright star through your telescope.
4. Framing and Composition
Use your smartphone’s screen to frame and compose your shot. This can be a bit challenging due to the small size of celestial objects in the viewfinder, so take your time to center the object and adjust your framing. Consider using a smartphone app designed for astrophotography to assist with object tracking and framing.
5. Capturing the Image
Once you’re satisfied with your setup and composition, use a remote shutter release or your smartphone’s timer to trigger the exposure. Keep in mind that even the slightest vibration can impact image quality, so avoid touching the setup during the exposure. Allow the smartphone to capture light for the predetermined exposure time.
6. Experiment and Iterate
Astroimaging is as much about experimentation as it is about technique. Don’t be discouraged if your first attempts don’t yield perfect results. Adjust your camera settings, framing, and focus as needed. Experiment with different exposure times and objects to find the perfect balance between capturing details and preventing motion blur.
7. Post-Processing Magic
Once you’ve captured your images, the journey continues in the digital darkroom. Transfer your images to your computer or use photo editing apps on your smartphone. Adjust the exposure, contrast, and color balance to bring out the celestial object’s details. Consider using stacking software to combine multiple images, reducing noise and enhancing fine details.
8. Share Your Creations
Don’t keep your astrophotography masterpieces to yourself! Share your images with friends, family, and fellow enthusiasts. Post your work on social media platforms, astronomy forums, and photography communities. Sharing your images allows you to connect with others who share your passion and receive valuable feedback to further refine your skills.
9. Patience and Persistence
Astrophotography is a journey that requires patience, dedication, and persistence. The night sky is vast and ever-changing, offering limitless opportunities to capture breathtaking images. Be prepared to spend time perfecting your techniques, learning from your mistakes, and celebrating your successes.
By following these steps, you’ll be well on your way to mastering astrophotography with your smartphone. Remember that each image you capture is a testament to your ability to bridge the gap between Earth and the cosmos, offering a glimpse into the universe’s boundless beauty. As you explore the mysteries of the night sky, your smartphone becomes a tool of discovery, enabling you to share the wonders of the cosmos with the world.